|
Installing SQL SYNC |
To use the SQL
Sync option, your organization will require personnel who are:
·
Proficient in SQL and database queries; or
·
Have knowledge of applications/report-writers such as Access
and Crystal Report Writer.
Please note that Parklane does
not offer such services.
·
Your Parklane System must use our Share option.
Under Share, the Parklane System runs as a client/server application with the
run-unit on the server.
Without Share, the
Parklane System runs on each user’s local drive.
The system needs a server environment (not a local computer) to establish and
use the OBDC connection.
·
Ensure that your Parklane System is up to date with the
latest changes.
·
Contact Parklane for a price quote. There is also a charge
for setup and will depend on the options and modules currently installed in
your application.
·
Parklane Support will provide you with the password to
activate this option.
SQL Data Structures
The documentation
required to develop queries is provided below. As additional modules are added,
we will update this table.
|
Module |
Entity Relationship Diagrams |
Field Definitions |
|
Personal Data |
||
|
Incident Reporting |
||
|
Disability Management |
||
|
Work Accommodation |
||
|
Attendance Module |
(n/a) |
|
|
Recall Module |
(n/a) |
|
|
Chart Module |
Note:
The Field Definitions have a column “Comp” (Company Number).
If your system is not using the multi-company option, the number in this column
will always be 00001.
Installing the MySQL Database
If you are a
hosted customer, Parklane Technical Services will perform the installation of
the SQL Database and the ODBC connection.
You will also require a secure VPN tunnel to the Parklane hosting server. This may require additional setup costs.
Once we have completed the installation, you will need to complete Point 3
below.
Please allow 5
business days.
If you are self
hosted, the set up of the SQL server is your responsibility. We have provided you with the necessary tools
to do so.
Any technical support required from Parklane will be billed at $150 per hour, 1
hour minimum.
Self-hosted
customers need to complete all steps below.
Hosted customers need to contact Parklane Support to configure their
connection.
1. Install the MySQL
server. For instructions click
here.
2. Create the MySQL
database. For instructions click here.
3. Set up the Server
ODBC driver on Parklane Server. For instructions click here.
4. Verify the ODBC setup
in Parklane. For instructions, click here.
5. Set up Client ODBC
driver on workstations. For instructions click here.
6. Assign client
permissions to MySQL database. For instructions click
here.
7. Contact Parklane
Support for the activation code.
You must have already authorized the annual support fee.
8. Logon to Parklane
and select the modules to be synchronized.
See details below.
9. Setup a Scheduled
Task to automate the synchronization, either daily or weekly. To schedule this
task, click
here
Generating the SQL Tables and Synchronization
The process to synchronize the Parklane data
base with SQL is not an automatic/real time activity for performance
reasons.
Rather, the synchronization is performed at the discretion or the customer, and
you decide when and
how often you want to perform this function.
There are two
methods to synchronize the databases: manually when prompted by a user or, as a
scheduled task.
·
Prior to using either method at least one user must have
access to the SQL Sync option in the Parklane System.
1. Under Security,
give access to one or more users who will be activating the
Synchronization.
Check
|
|
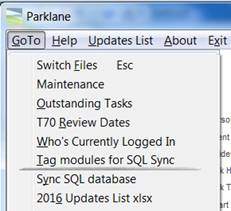
2. Once access to SQL
Sync has been given, that user will sign into the system,
On the Main Menu > GoTo (Menu Bar) > Tag modules for SQL Sync.
|
|
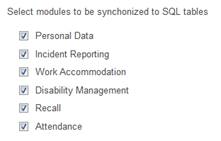
Check which
modules are to be synched.
|
|
·
You may manually prompt the synchronization:
To build/sync the
SQL database, on the Main Menu > Go To (on Menu Bar) > Sync SQL Database.
Automated Synchronization using a
Scheduled Task
·
A scheduled task may be set up by customer to activate the
synchronization automatically.
This uses an
additional run‐time while running; therefore we recommend that it be
scheduled for after hours.
You will need to
create a scheduled script that calls \HS\PSSQL.CMD
For instructions
on how to schedule this task, click here
·
When SQL tables are synched, users with access to the SQL
Sync will be shown the date of the last sync on the Main Menu.
|
|